Blog
Arduino Adventures Episode 1 — Deboucing The Bouncing Button (Controlling LED via Push Button using Arduino)
Posted on October 31, 2024 (Last modified on June 25, 2025) • 4 min read • 811 words
The more I dive into the wonderful world of programming for Arduino, I get these crazy small challenges that show all the beauty and warts of electronics and code. It starts with a simple idea, now so easily achieved and it lands in the territory of improvisation which is where all projects end up happening. In this exercise I will show you my adventure to make the infamous push button -> LED connection which turned out to be very interesting at some moments and confusing on others.
First of all, let me summarize the basics to you. There are three major segments when you’re programming in Arduino (atleast at the basic level): Definition, Setup, and Loop. It’s syntax is just like C, and therefore I’m pretty familiar with it (despite the fact I tried C around three years ago and never looked back at it). For the IDE and the simulation (since I can’t afford a real Arduino), I’m using Wokwi.
First of all, you build the circuit, something like this:
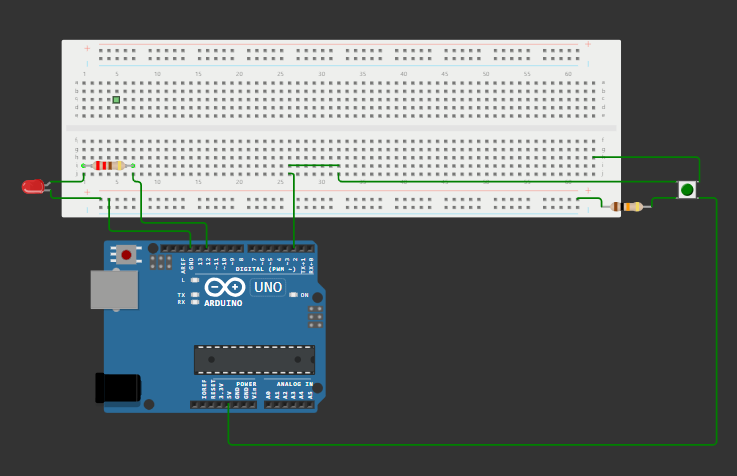
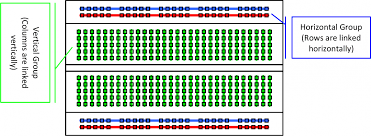
The white thing above is called a Breadboard and this is how the different holes in the breadboard conduct to each other:
The LED light here is connected to the 12th pin and the push button is connect to the 2nd port (and also the 5V power pin). Both the components are grounded through the breadboard. The resistor that is connected to the LED is 220 Ohms and the one connected to the push button is 10K Ohms.
Now, let us dive into the code:
Let’s understand the logic behind what we want to accomplish. We want to program our Arduino Uno such that whenever we push the button, the led light glows up. Simple, right? Let’s see how easy it goes.
At first, I tried the following code:
#define light 12

#define button 2


void setup() {

  pinMode(light, OUTPUT);

  pinMode(button, INPUT);

}


void loop() {

  int reading = digitalRead(button);

  if (reading == HIGH) {

    digitalWrite(light, HIGH);

  }

}
But this is not it. This code has a flaw. It commands the board to turn on the light but never tells it when to turn it off. So once you push the button, the led light glows up but never turns off until you reset it.
So, we need to modify our code a bit.
#define light 12

#define button 2

#define test 13


int lightStatus = LOW;


void setup() {

  pinMode(light, OUTPUT);

  pinMode(button, INPUT);

  pinMode(test, OUTPUT);

}


void loop() {

  int reading = digitalRead(button);


  if (digitalRead(light) != lightStatus) {

  digitalWrite(light, lightStatus);

  }


  digitalWrite(test, reading);


  if (lightStatus != reading) {

    lightStatus = reading;

}

}
Here we go. We did the modifications and when I tested it out:
DRUM ROLLSSS!!
It didn’t work as expected. I clicked on the button, it lit up for the time I had pressed the button and when I released it, the LED stopped glowing. So it’s working right? Not always. It tried it four times in a row and there comes a time when the LED doesn’t turn turn off even when I’m not pressing the button. Kinda skeptical, isn’t it?
I asked my AI friend, Perplexity (whom I sometimes affectionately call Perp), and he explained to me the main cause behind the problem. It’s actually very common. It’s due to the bouncing effect of the push button. Basically, when you press the push button it doesn’t directly go HIGH, instead it fluctuates between HIGH and LOW for some milliseconds before stabilizing at HIGH. This fluctuation gives incorrect reading to the software and the software interprets it as the final input.
To fix this, we use what we call a “Debouncing Logic”.
The basic principle behind this concept is to delay the reading for about 50ms — it’s the safe time when the fluctuations won’t be happening anymore and you’d still be pressing the button.
The code for the same is as follows:
#define light 12

#define button 2

#define test 13


int firstCaptureTime;

int debounceDelay = 50;

int lastButtonState = digitalRead(button);

int reading = lastButtonState;


void setup() {

  pinMode(light, OUTPUT);

  pinMode(button, INPUT);

  pinMode(test, OUTPUT);

}


void loop() {

  if (digitalRead(button) != lastButtonState) {

    firstCaptureTime = millis();

  }

  if (millis() - firstCaptureTime > debounceDelay) {

    reading = digitalRead(button);

  }


  digitalWrite(light, reading);

  lastButtonState = digitalRead(button);

}
And it works fine. Still sometimes, the light behaves unexpectedly but it’s not because of the bouncing. It’s probably the software issue.
Anyways, that was it for this episode. It was just a small problem, but I put it before you to show you that I’m actually learning. And as I learn more, the problems will grow and become more interesting and we will be having much more fun solving them.
Thank you for reading this episode and showing interest. Please do consider following me for more such intriguing problems. Don’t hesitate to connect and message me anything you have in mind.